Introduction to Resin Casting
Resin casting is an exciting and versatile way to create beautiful art pieces. Whether you’re new to the craft or looking to hone your skills, understanding the basics is crucial to achieve those dreamy, clear, and bubble-free creations. Resin is a liquid that transforms into a solid state, offering endless possibilities for artists and hobbyists alike. As you dive into resin art, envision the vibrant colors, intricate designs, and polished finishes you’ll bring to life. Let’s get started on your resin journey!
Just a heads up, some of the links to recommended products below include links to Amazon Products which we earn commission on! So if you buy, thanks for taking the information we are giving here and using it in a way to further the industry!!
Essential Materials for Resin Casting
Welcome to the wonderful world of resin casting! Before you start creating your first masterpiece, it’s crucial to gather all the essential materials. Trust me, having the right tools and supplies will make your casting experience smooth and enjoyable.
Types of Resin
Resin is the star of this show, and choosing the right type can make all the difference. Here’s a quick breakdown of the most common types:
– Epoxy Resin: Great for beginners as well as advanced, and the only type we use for Floral Preservation! This resin is easy to mix and typically allows for a longer work time. It’s perfect for creating small art pieces or jewelry. We personally use iCoat HV Epoxy, and you can use code MOLDi10 to get 10% off your order!!
– Polyester Resin: Often used for larger projects, it’s more affordable but tends to have a stronger smell and requires more safety precautions.
– Polyurethane Resin: Known for its fast curing time, this is ideal for industrial or prototype casting, but it’s less user-friendly for beginners.
– UV Resin: Cures quickly under UV light and is perfect for small crafts and quick fixes.
Molds and Tools
To create stunning resin art, you’ll need a selection of molds and tools:
– Molds: Silicone molds are fantastic because they’re reusable and allow for easy release of your resin piece. You can find molds in a plethora of shapes and sizes, including HDPE Molds, catering to every artistic fancy
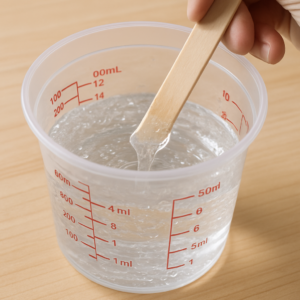
– Mixing Cups: Transparent, disposable cups are ideal for seeing the resin and hardener blend together. Measurement marks are a bonus!
– Stirring Sticks and Handheld Mixer: Wooden or plastic sticks work, but an electric handheld mixer can help reduce bubbles significantly.
– Heat Gun: Essential for removing air bubbles, a heat gun can also help level the resin out for a smooth finish.
Safety Gear and Precautions
Safety first! When working with resin, it’s important to protect yourself:
– Nitrile Gloves: Protect your skin from resin contact. They are sturdy and resistant to chemicals, unlike latex gloves.
– Respirator: Ensure your safety by wearing a respirator, especially if you’re working with polyester or polyurethane resins.
– Safety Glasses: Shield your eyes from splashes and dust particles.
Remember, it’s vital to work in a well-ventilated area to minimize inhaling fumes.
Preparing Your Workspace

Setting up an efficient workspace will set you up for resin casting success. Let’s dive into how to prepare your crafting area.
Choosing the Right Environment
A proper environment can make or break your resin casting experience:
– Ventilation: Choose a space with good airflow to disperse any fumes.
– Flat Surface: Ensure your worktable is stable and level to avoid uneven curing.
Organizing Your Materials
See that your materials are readily accessible and organized. This helps streamline your process and allows for a more enjoyable experience: Below are some recommendations, but always check with your resin manufacturer to make sure you are using the product correctly!
– Arrange your molds, tools, and protective gear within arm’s reach.
– Lay out newspaper or a protective cover to avoid spills on your work surface.
Understanding Temperature and Humidity Effects
Temperature and humidity can alter how resin cures, so it’s important to monitor these factors closely:
– Temperature: Resin typically cures best at around 70°F to 75°F (21°C to 24°C). Many resins are sensitive to temperature, and a controlled environment helps prevent issues like yellowing or cracking.
– Humidity: High humidity can affect curing times and cause surface imperfections. Aim for a low-humidity environment, ideally below 50%, to achieve the best results.
With your essentials gathered and workspace prepped, you’re well on your way to crafting clear and bubble-free resin creations. Embrace the process, take your time, and soon you’ll be producing stunning works of art!
Basic Techniques in Resin Art
Getting started with creating those mesmerizing resin artworks? Let’s dive into some basic techniques that will set you on the right path to mastering resin casting.
Mixing the Resin Properly
The first step to perfecting your resin art is mastering the mixing process. Why is this so important? Well, improper mixing can lead to sticky surfaces and uneven curing. Here’s how you can avoid these pitfalls:
– Follow the Instructions: Resins typically come with an A and B component that need to be mixed at a specific ratio. Always read the manufacturer’s instructions carefully.
– Slow and Steady Mixing: Pour both components into your mixing cup and stir slowly. This helps minimize the introduction of air bubbles. This is a HUGE pro tip!
– Use the Right Tools: A handheld mixer specifically designed for resin, along with a sturdy mixing cup, will ensure a more even and thorough mix, but may create bubbles which have to be eliminated later with a degassing chamber.
Patience is essential. Take your time during this step to ensure the resin is mixed smoothly.
Pouring and Layering Techniques
Now that you’ve got your perfectly mixed resin, it’s time to pour! Here are a few tips for making sure your pour looks professional:
– Work in Layers: Pouring in layers helps avoid excess heat build-up, which can cause unwanted bubbles and imperfections.
– Level Work Surface: Make sure your surface is level to prevent resin from pooling on one side.
– Use a Pouring Technique: Whether it’s a swirly pour or using specific patterns, find a technique that you’re comfortable with and complements your desired design.
These methods will help you achieve a more controlled and aesthetically pleasing result.
Removing Bubbles Effectively
Even when you mix slowly, bubbles can still occur. But don’t worry, there are effective ways to tackle them:
– Use a Heat Gun: A heat gun is your best friend when it comes to bubble removal. Gently apply heat by moving it in small circular motions over the surface.
– Toothpick Trick: For persistent bubbles, a toothpick can be used to carefully pop them before the resin starts setting.
– Wait it Out: If you still see bubbles after your initial attempts, sometimes simply waiting for a moment can help, as bubbles naturally rise to the surface for easy removal.
These techniques should leave your resin art wonderfully clear and smooth.
Advanced Resin Casting Techniques
Ready to take your resin art to the next level? Let’s dive into some advanced techniques.
Incorporating Additives and Colorants
Adding color and texture to your resin projects can create striking effects:
– Choose the Right Colorants: Use pigments, dyes, or mica powders specifically designed for resin to ensure they don’t disrupt the curing process.
– Mix Gradually: Be sure to add small amounts of colorant gradually to avoid overpowering the resin and affecting its setting properties.
With practice, you’ll find the perfect balance for vibrant, eye-catching designs.
Embedding Objects
Want to embed flowers, stones, or other objects? Here’s how to do it effectively:
– Seal Objects: Items like photographs or paper should be sealed with a clear spray or glue to prevent them from absorbing resin.
– Strategic Placement: Consider the positioning and depth at which you’d like to place each piece. Use tweezers for precise placement.
– Layering Strategy: If embedding large items, pour a thin layer first, position the object, then cover with another resin layer to lock it in place.
Embedded elements add depth and interest to your projects, turning them into keepsakes.
Creating Unique Textures and Patterns
Finally, explore textures and patterns to give your resin pieces distinct character:
– Texturing Tools: Use items like combs or silicon molds to add texture to your resin that can be further highlighted with metallic powders.
– Swirl Designs: Achieve a marbling effect by pouring resin mixed with different colorants and swirling with a stick.
– Experiment Boldly: Don’t hesitate to experiment with different materials and tools to discover new textures and patterns.
With these advanced techniques, your resin art can break the mold of traditional flat designs and reach new creative heights. Happy crafting!
Troubleshooting Common Resin Casting Issues
Creating flawless resin art can feel a bit daunting at first, especially when things don’t go as planned. But fear not! Here, we’ll tackle some of the most common resin casting issues to help you achieve those smooth, crystal-clear masterpieces.
Tackling Sticky Surfaces
Sticky surfaces are a common frustration for many resin artists, especially beginners. This issue usually stems from the resin not being mixed thoroughly or accurately. Remember, mixing resin is a precise science. Ensure that you measure both parts of the resin and hardener accurately, using separate mixing cups to avoid cross-contamination. Use a handheld mixer or a sturdy mixing stick, stirring slowly for 3 minutes, scraping the sides and bottom to mix everything thoroughly. If you still encounter stickiness, your best bet is to re-pour the resin: gently sand down the sticky layer and add another properly mixed coat on top.
Dealing with Bubbles and Imperfections
Bubbles – the nemesis of smooth resin artwork! They can pop up for multiple reasons, from mixing too vigorously to environmental factors like humidity. To minimize bubbles, make sure to mix your resin gently, and let it sit for a few minutes after mixing, allowing bubbles to rise to the surface. A heat gun can be your trusty sidekick here. Carefully wave the heat gun over the surface of your resin to pop lingering bubbles. But be mindful, too much heat can cause yellowing or even burning. Finally, work in a dust-free environment to avoid dust specks and bits that may cause imperfections.
Avoiding Mold Mishaps
Choosing the right mold ensures your project has the perfect shape and smoothness. Silicone molds are popular due to their flexibility and ease of release. Before you pour, make sure your molds are clean and free of any previous residue. If your resin sticks to the mold, it may be due to inadequate curing time or contaminants. To avoid this, follow the manufacturer’s recommended curing time and consider using a mold release spray for an easy, clean release. If you do face some unfortunate sticking, gently flex the mold to coax it out without damaging your precious piece.
Achieving Professional Finishes
The finishing touches can really set your resin art apart, transforming it from a simple pour to a stunning, gallery-ready piece. Here’s how you can achieve that professional edge:
Sanding and Polishing Techniques
Once your resin piece has fully cured, you may notice rough edges or a less-than-glossy finish. Start by sanding your artwork with fine-grit sandpaper. Gradually move to even finer grits for a smooth base. Protect your hands with nitrile gloves and use a respirator to avoid inhaling dust. For that professional shine, applying a polishing compound with a soft cloth can work wonders. By buffing in small, circular motions, you’ll enhance its gloss, leaving your artwork gleaming.
Sealing and Protecting Your Artwork
Sealing your work not only boosts the shine but also acts as a safeguard against scratches and UV damage, maintaining the color vibrancy. For a long-lasting finish, apply a clear resin gloss or spray sealant as a topcoat. Ensure your initial layer has cured completely before sealing. This topcoat will act as armor for your piece, keeping it sparkling and safe for years to come.
Mastering resin casting doesn’t happen overnight, but with patience, practice, and these handy tips, you’ll be well on your way to creating show-stopping resin art!
Conclusion
Creating stunning resin art that’s perfectly clear and free from annoying bubbles might seem like a daunting task, but with the right techniques, you’ll get there with ease. Remember, practice makes perfect! Start by selecting the best resin and using proper tools like nitrile gloves, a respirator, and a heat gun. Always use clean mixing cups and consider a handheld mixer for a thorough blend.
Keep experimenting and don’t be discouraged by initial hiccups. Every piece you create will get you one step closer to becoming a resin casting pro. Happy crafting, and may your resin adventures be as smooth and bubble-free as you design them to be!


I use liquid glass casting epoxy and I’m having a hard time …..timing the layers…..I still get lines and not an easy blend of pours. I’m waiting about 32 hours between pours. Any suggestions. I’m a bit nervous to use Icoat because they were having trouble with heat blooming/burns and yellowing.
Hey there! If you are referencing the layer lines, visible from the side, there’s no way around it. All resins will have it. If it’s something else, please email a pic to us and I’d love to attempt to help you with getting to the bottom of it